
Crime dramas like CSI often solve the case by using a technology called DNA fingerprinting, so most students are familiar with it. They have a lot of misconceptions about how DNA fingerprints are made, possibly because the word “fingerprint” isn’t very accurate. I try to switch that term to “DNA profiling” to help students understand that it is not an actual fingerprint.
This activity introduces students to gel electrophoresis. They learn how that process leads to the bar code images we associate with DNA fingerprints. Though freshman students will not perform this procedure, I set it up in the front of the class and have some students practice loading dye into the gel.
Students also view the NOVA interactive that walks students through the steps. They can do this on their own or you can walk them through it on the overhead.
Second year biology students will actually run a DNA simulation to diagnose a disease or solve a crime. I have considered modifying the simulation for freshman classes, but cost is a barrier. The equipment and materials are expensive! You can potentially reduce the cost by making casting trays with agar (not agarose) if you wanted ore students to practice loading samples.
DNA Extraction and Digestion and Analysis
In the first section of this activity, students learn about restriction enzymes and how they are used to cut DNA into fragments. They then examine a DNA sample and determine where the recognition sites are and count the number of fragments.
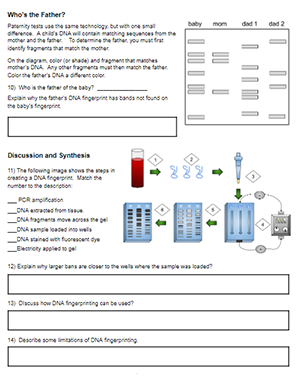
The second section of the activity focuses on how the length of the fragments determine how far they will move in the gel. Shorter fragments will move farther than longer ones. This is why DNA fingerprints look like a bar code. Each bar represents a fragment of digested DNA. If the DNA from the sample matched the suspect’s DNA, then the bars will be in the same position.
In the next section, students examine images that represent a DNA fingerprint. They circle or shade where the bars match and identify the suspect that likely committed the crime. They even solve a paternity case where they identify the father by matching bars from the baby to mom and to dad.
In the final section, students label a diagram that shows the procedure. Again, I think it is important to at least have one apparatus set up so students can compare the diagram to the real thing. You could potentially show them a photograph instead. Students also consider how the technology may have limitations. You might want to open this to a group discussion. Not all cases can be solved just because you have DNA!
Grade Level: 9-12
Time Required: 30-40 minutes