
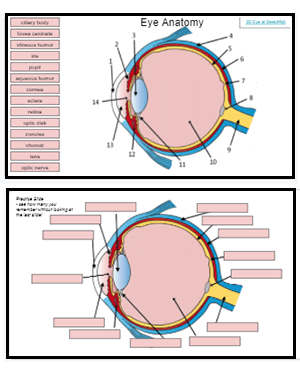
This labeling activity was designed for remote learners so that students can practice identifying the anatomical structures of the eye. The activity was made with Google slides so that students can move the text boxes to the numbers on the labels.
The image of the eye shows major structures, like the cornea, lens, fovea centralis, optic disk, retina, and choroid. The eye works by allowing light to enter through the cornea and adjusting the size of the pupil. The light focuses on the retina which transmits the information through the optic nerve. The brain then interprets those signals and forms and image.
I pair this activity with manipulative eye models. Students can view the printed (or slide) version while they explore the models. Another fun activity to do in class is to find the “blind spot.” Close one eye and hold a pencil at arm’s length. Move the pencil slowly to to the side until it fades from view. That’s where your blind spot is!
The second slide is more challenging in that students need to type the correct label. They can refer to the first slide to complete this section.
The last slide doesn’t have arrows and has a different eye diagram facing the opposite direction. Students must use the arrow tool and their own text boxes to identify structures.
The Google Doc linked below is a paper version of the labeling that has a word bank at the bottom of the sheet.
Eye Anatomy Resources
- Eye Study Set from Quizlet
- Virtual Eye Dissection
- Dissection of the Cow Eye
- Eye Anatomy Coloring
- Excerpt from Human Errors by Nathan Lents
- Label the Eye (paper version)