I have used this demonstration every year to introduce the scientific method. The worksheet below is optional and includes instructions for writing a lab report and doing a more involved investigation, but for the beginning of the year, I prefer to just have students observe and give their suggestions for how to test various hypotheses.
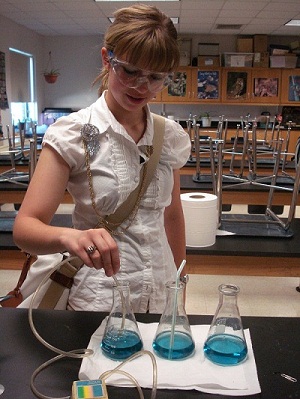
The set-up is simple. Place bromothymol blue in a flask and use a straw to blow into the liquid. For drama, make sure you put on safety goggles. The BTB will turn yellow after you’ve blown into it, this change occurs because the carbon dioxide in your breath is acidic and BTB is an indicator.
Note on BTB: Color may vary when you first open the container. It may appear more yellow/green then blue. Create a “stock” to use with the class by adding a weak base (NaOH) to get the color to a blue. I mix this in a 500 ml flask and then pour the mixture into smaller beakers or flasks so that each demonstration starts at the same color.
Beginning questions should start with how do they know it changed color? If you don’t blow into the mixture for very long, the color change will be subtle. This is where you can guide students to the concept of a control. Create another experiment where you have two flasks that start out at the same color, blow into one and then students can be sure a color change has occurred.
Engage and Explore
The next part of the discussion asks students to propose ideas for WHY the solution changed color. Was it something in the breath? Was it the bubbling/mixing of the liquid? Did I put something into the mixture through the straw? Ask students to propose ways for each of these hypotheses to be tested. I will often have an aquarium pump sitting nearby for inspiration. Eventually a student will suggest to use the pump to blow bubbles instead of my breath. When you test this, there will be no color change.
In the last part, discuss what is it about the breath that makes the color change. This part might require more guidance depending on how much chemistry students have been exposed to.
Use acidic and basic solutions to show students how BTB changes colors and why it is known as an indicator. You can also show them other indicators, like phenol red and show them how pH paper works.
Later in the year, students may explore another indicator, phenol red. In this lab, students place plants in a solution of phenol red and observe color changes due to photosynthesis. When plants use carbon dioxide, the solution will change from yellow to pink.
NGSS – Science Practices: 1. Asking questions (for science) 2. Developing and using models 3. Planning and carrying out investigations 4. Analyzing and interpreting data 5. Using mathematics and computational thinking 6. Constructing explanations (for science) and designing solutions (for engineering) 7. Engaging in argument from evidence 8. Obtaining, evaluating, and communicating information

