
The sliding filament model of muscle contraction is a challenging concept for anatomy students. In this worksheet, the process of muscle contraction is broken into steps. Students practice labeling the steps with me during class (page 1). On the next page, students practice independently by matching the steps, which are listed, to the box on the diagram. You can project the last slide for students to copy (page 3) which contains the answers.
In class, the Google slides contains the images for students to practice with. Students have already learned the structure of muscle fibers (actin and myosin) and how they are arranged into light and dark bands. They also complete a sarcomere coloring exercise that helps them visualize the anatomy of a muscle fiber. Students can also learn about the process using the Coloring Model of the Sliding Filament Model.
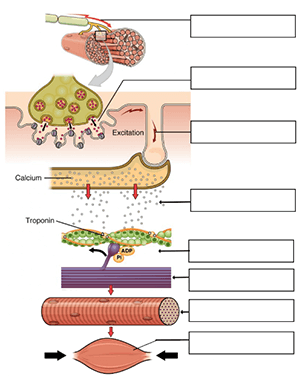
Steps of Muscle Contraction:
1. Action potential arrives at neuromuscular junction
2. Ach is released and bind to the receptors
3. Action potential travels along the T tubules
4. Calcium is released into the sarcoplasm
5. Calcium binds to troponin on the thin filament, exposing the binding site for myosin
6. Power stroke, thin filaments are pulled toward the center
7. Muscle fibers shorten
8. Muscle contracts
Shorter Version
Here is a shorter version can also be used for assessment, where the steps are condensed:
1. Action potential arrives
2. Acetylcholine (Ach) is released
3. Action potential travels down T tubules
4. Calcium is released into sarcoplasm
5. Calcium binds to troponin, actin and myosin bind
