Story Lab: Microscopes and the Letter “E”


 When I got to class today, I knew we were going to be looking at microscopes because the day before we had learned all the parts of the microscope and how to properly carry one. Our teacher, Mrs. Hooke, wanted to go over the microscope first before we went to the laboratory. In fact, she said we would only start working with the equipment when she was satisfied that we knew all of the parts.
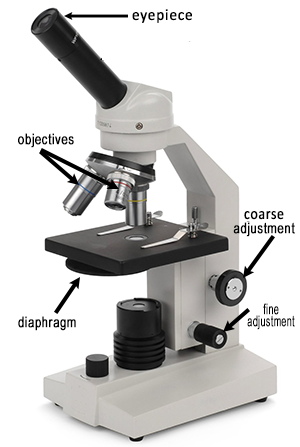
At first she held up the microscope and pointed to the top. “This is the part where you look, what is it called.”
I raised my hand immediately, that was just too easy. “It’s the eyepiece!”
“Very good, Penny. Let's see if your lab partner knows where on the microscope you place the slide.”
I had to practically sit on my hands as I waited for Poppy to answer. It took her a little while and then finally answered “The stage?” I breathed a sigh of relief. At this rate, we were never going to get into the lab.
Mrs. Hooke went down the rows, asking each student to answer something about the microscope. There was one question that really stumped everyone. She asked what part the objectives attached to. No one could answer that one, not even me. It seemed like it was something that rotated. Mrs. Hooke waited, and I was starting to get nervous that we wouldn’t go to the lab at all. Then she touched her finger to her nose and tapped twice. She looked directly at me. Was this some kind of a code!? She tapped her nose again and then I finally got it. I blurted out without even raising my hand “revolving nosepiece!” Mrs. Hooke nodded and gave us instructions to head over to lab and find a microscope.
My microscope looked similar to the one Mrs. Hooke showed us. I followed the instructions to plug in the microscope and pick up the letter “e” slide that was sitting in a tray next to the microscope. The directions in the lab handout said to place the letter “e” on the slide so that the “e” was right side up and to ake sure the letter was positioned directly over the hole where the light was coming in.
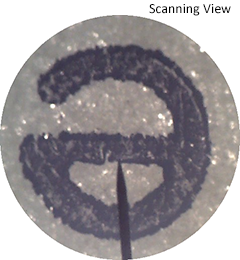
The directions said to use the scanning objective, which is the shortest one and use the coarse knob to bring the “e” into focus. It worked slowly and could finally see the letter. I was surprised to see that it was upside-down. I looked on the stage and I had put it there pointed the right way, but it seemed like the microscope reversed the image! I was told to draw the “e” exactly as I saw it through the lens, so I made sure to draw it upside-down.
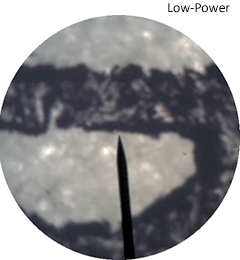
I also noticed that there was a weird line in the lens. I thought the microscope was broken, so I called Mrs. Hooke over to report it. She smiled and told me to twist the eyepiece and watch. When I did that, the line moved in a circle. Then she asked “what do you think that’s there for?” I pondered it, thinking that I had an idea. “Do you use it to point at things on the slide?”
She nodded. “Yes, it’s called a pointer!”
The next step required me to switch to the low power objective, which was the medium-length one. I turned the nosepiece and heard the objective snap into place. When I looked into the microscope, I could still see the letter, but it was much bigger and some of it was no longer on the slide. It was also slightly blurry, so I used the coarse knob to bring the letter back into focus. This time when I drew the “e” I was careful to only show the parts of the letter that I could see.
The High Power Challenge
The lab guide warned that the next step would be the most difficult. It reminded me that you had to do the first two steps before attempting to focus on high power, so I checked the boxes indicating that I had
1) Focused the “e” with the scanning objective
2) Focused the “e” with the low power objective.
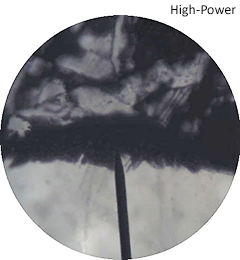
I read the directions carefully, at this point I needed to switch to the high power objective. When I clicked it into place, I noticed that the lens was almost touching the slide. The directions said not to touch the coarse focus but to only use the fine focus when using the high power. I looked into the eyepiece, but I couldn’t see much, it seemed dark and a little blurry. I twisted the fine focus and slowly something came into view. It didn’t look like an “e” at all, but I could see a line, and the dots that made up the ink that created the letter. Success!
1. What part of the microscope are the objectives attached to? _______________________________
2. What part of the microscope do you look into? _________________________________
3. Which objective is the shortest? ___________________________________________________
4. Students in Penny’s class had to do what before going to the lab? _______________________
5. What did Penny notice right away about the letter “e” when first view with the scanning objective? __________________________________
6. What was the line she saw in the viewing field? _____________________________
7. What knob is used to focus the microscope with the scanning and low power objective? _____________
8. What knob is used to focus the microscope with high power objective? _____________
9. What steps must be taken before attempting to use the high power?
10. Why was Penny unable to see the letter at high power? What could she see instead?
Related Activities
Introduction to the Microscope – E Lab – explore how to use a light microscope (Letter E Slides)
Microscope Coloring – label and color the parts of the microscope
Label the Microscope – simple graphic to practice identifying microscope parts