Microscope Introduction - "e" Lab


1. Place the slide of the “letter e” on the stage so that the letter is over the hole and is right side up as you look at it with the naked eye. 
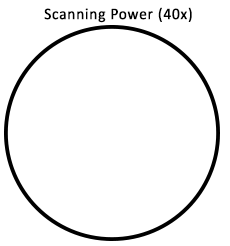
2. Use the scanning objective to view the letter and use the coarse knob to focus.
Draw the “e” as it appears in your viewing field. You should draw it to scale, meaning it should take up as much of the circle in your drawing as it does when you view it.
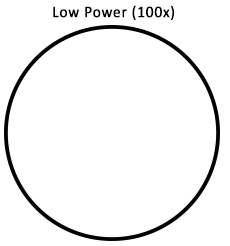
3. Switch to the low power objective (this is the medium sized one). You should hear it click into place. Look in the microscope, the ‘e’ should still be visible, but it will be bigger and it might be blurry. Use the coarse knob to bring it back into focus. You may also want to move the slide to re-center the ‘e”.
Draw the “e’ to scale in the circle below.
4. Switch to the high power objective (this is the longest one). Now when you look into the microscope you probably won’t see the “e.” At this magnification, you are just seeing a part of the “e” and the ink used to print it. At high power, you will need to focus, but this time, only use the FINE ADJUSTMENT KNOB. You should only need to rotate it a little bit to bring the slide back into focus, so turn the knob slowly.
Common Things
5. Obtain a slide from the "common" box - sketch under scanning and low power. Use the label on the slide to name each.
Depth Perception
6. Obtain a slide with three different colored threads on it. View the slide under scanning and then
low power. You should note that you could only focus on one colored thread
at one time. Figure out which thread is on top by lowering your stage all
the way, then slowly raising it until the thread comes into focus. The first
thread to come into focus is the one on top.
Which color thread is on top? _____________
Which color thread is in the middle? ______________
Which color thread is on the bottom? ____________
Using a Stereoscope
7. Stereoscopes are used to view large or thick specimens. It does not have as great of a magnification, usually about 4x. View the specimen on the sterescope (1-2 will be placed in the room for you.)
What object did you look at? _______________________________
Why would you not be able to view this object with the light microscope?
Analysis
8. Answer true or false to each of the statements
__________ On high power, you should use the coarse adjustment knob.
__________ The low power objective has a greater magnification than the scanning
objective.
__________ The fine focus knob visibly moves the stage up and down.
__________ Images viewed in the microscope will appear upside down.
__________ The type of microscope you are using is a scanning microscope.
__________ For viewing, microscope slides should be placed on the objective.
__________ In order to switch from low to high power, you must rotate the
revolving nosepiece.
__________ You can tell that the objective is in place because it makes a clicking noise.
__________ A stereoscope is used to view large objects.
__________ The first step in viewing specimens is to use the high power objective.
__________ A stereoscope is binocular, meaning it has two eyepieces.
9. You are tasked to go to the junior high and help students there use the light microscope. Write a short, step-by-step guide to tell younger students how to focus a slide using the high power objective.
Other Microscope Resources
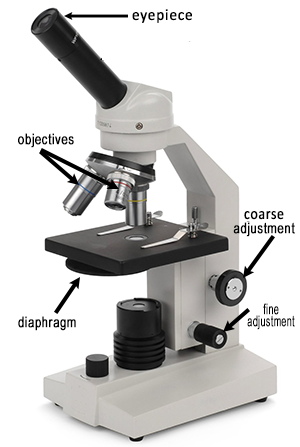
Microscope Coloring – label and color the parts of the microscope
Label the Microscope – simple graphic to practice identifying microscope parts
Guide to Using the Light Microscope – step-by-step instructions on how to focus images and create wet mount slides.
Microscope Investigation for AP Biology – refresher on how to use a microscope and how to measure viewing field