Investigation: How Do Bacteria Grow?


Goals:
1. Inoculate plates with samples taken from surfaces at the school and observe growth of bacteria colonies.
**This lab may take several days, keep all data and observations in a separate notebook to be compiled and organized into a final lab report.

Safety Precautions:
1. Always use STERILE TECHNIQUE
2. ASSUME that any bacteria that grows on your plate is harmful and treat as such
3. Always WASH HANDS after you are finished handling plates
A. Inoculating Your Plates
Pre-poured agar plates can be purchased from biological supply companies.
A solid source for bacterial growth is essential if organisms are to be isolated. In the laboratories of Robert Koch, gelatin was first used to achieve bacteria colonies. Agar now serves as a more useful material; it will remain solid until heating and then will solidify as it cools. Before it cools (and solidifies) it can be poured into petri dishes. Using sterile technique minimizes the contamination of the agar before you are ready to inoculate it with bacteria from other sources.
Your agar plates will be prepared for you in advance.
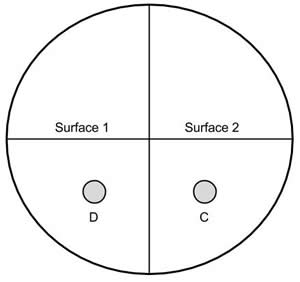
Without opening any of the petri dishes, use a marking pen to divide the dish into four quadrants and label the sections as shown on the bottom of the plates.
Surface 1: Any surface in classroom, hall or bathroom. Use sterile cotton swabs.
Surface 2: Any surface in classroom, hall or bathroom. Use sterile cotton swabs.
D: Touch your finger gently to this circle.
C: Clean your finger with an alcohol pad or soap and touch it to this sector.
*Plates should be incubated in a warm environment. Incubators can be purchased, or made using a covered aquarium and heating pads.
B. Analyzing Colonies
You will identify and categorize different bacterial colonies based on varied appearance and morphology (form and structure), When a single bacterial cell is deposited on the surface of a nutrient medium (agar), it begins to divide exponentially. After thousands of cells are formed, a visible mass appears which is called a COLONY. Each species of bacteria will exhibit characteristic colonies.
DO NOT open the plates to examine the colonies.
Terms
- Colony Shape and size -- round, irregular, punctiform (tiny)
- Margin edge -- entire (smooth), undulate (wavy), lobate (lobed)
- Elevation -- convex, flat, raised
- Color -- color + opaque, translucent, shiny or dull
- Texture -- moist or dry (rough)
1. Draw each plate, showing how colonies are spread across the agar surface. Pay attention to density of colonies and where they are located with regard to surfaces and fingerprint impression.
2. Pick several colonies on your plates and describe them using the terms above.
3. (Optional) You may wish to photograph your plates and include them in your final lab report.
C. Observe Known Bacteria samples
Use internet sources, slide viewers, and prepared slides to identify the different shapes and types of bacteria. Your investigation should include, but not necessarily be limited to the following well-known bacteria.
Bacteria slides can be purchased from biological supply companies.
1. Escherichia coli
2. Staphylococcus aureus
3. Bacillus subtilis
4. Cholera vibrio
5. Serratia marcescens
6. Lactococcus lactis
Include sketches, photos, or descriptions of samples you viewed in the lab.
Choose a single type of bacterium to showcase for this section of the report and provide additional information about the bacterium, such as where it’s found, how it reproduces, or its significance to scientific research. You will need to research this.
D. GRAM STAIN
Gram Stain Kit can by purchased from biology supply companies.
Microbiologists use a special level of classification to describe eubacteria – it is called the “Division”. Eubacteria are placed in a division depending on the type of cell wall they have. A bacterium with a cell wall that has a large amount of petidoglycan, is classified as gram (+) and stains dark-purple. Bacteria with a thin peptidoglycan layer are classified as gram (-) and will stain pink.
Gram stains can be difficult and take practice. Follow the steps exactly as listed. If done correctly, you should be able to identify your bacteria as Gram + or Gram - and check resources to see if you are correct. If known samples are not available, you can gram stain a sample from your petri dish, but there will be no way to check your accuracy.
1. Use a sterilized innoculating loop to transfer a small droplet of water to a clean slide. Sterilize loop.
2. Add a sample of a known culture to the droplet and pass it briefly over flame to heat fix the sample.
3. Add 1-4 drops of crystal violet over the fixed culture. Let stand for one minute.
4. Pour off excess stain and gently rinse the slide in tap water. Keep in mind, the objective is to wash off the stain, not the fixed culture.
5. Add about 1-4 drops of iodine to the smear. Let stand for one minute.
6. Pour off excess iodine and rinse the slide with water as before.
7. Tip the slide and add several drops of the ethyl alcohol to the upper end. Allow alcohol to flow over the smear. After several seconds, rinse the slide again.
8. Add about 5 drops of the safranin to the slide. Let stand for one minute.
9. Rinse the slide again, drain and blot away excess moisture. Let the slide dry.
Compare each of the samples colors, taking note of whether the sample a light pink color (gram -) or a dark purple color (gram +). Don't forget to write down the names of your samples to include in your lab report later.
If your gram stain was not successful, use google to research your sample and find out what it is.
Bacteriology – Lab Report Guidelines Due Date: _____
Review the "Goals" listed at the beginning of this document. Your job is to demonstrate that you have achieved these goals.
Choose One Project for your Final Report
Infographic
Create an infographic (piktochart), Slide Presentation, or traditional lab report (typed) that demonstrates that you have achieved the GOALS listed at the beginning of this lab guide. You are free to use whatever means you think will show me that you have engaged and learned something in this lab. Suggested content:
Photographs (your own)
Images from websites (cite sources)
Paragraphs / Essays / Lists that explain a procedure or understanding (please do not copy this lab guide, summarize or put in your own words)
Drawings of samples
Due Date: _________
Grading Rubric
Aseptic Technique observed during lab, locations where samples were taken described __3__2__1__0
Growth of colonies on plates observed, described in detail using appropriate terminology __3__2__1__0
Individual bacteria observed using a microscope, descriptions included, focus on a single bacterium (research)__3__2__1__0
Gram stain procedure attempted, student was able to stain and identify types of bacteria __3__2__1__0
Overall Presentation - report shows attention to detail, provides evidence from the lab, organized __3__2__1__0
Teacher's Notes: Samples of E. coli and bacillus subitlis can be ordered from Frey Scientific: Microlive Cultures